Produced with Scholar
Icon for Behind the Mask: 3D Art

Behind the Mask: 3D Art

Art and Ceramics

Learning Module

Abstract

Year 7 students learn about the elements of design, 3D Arts and ceramics techniques. They also learn about Asian theatre masks, how they are used and what they mean in Asian cultures. They apply their understanding and knowledge of the elements of design and 3D arts and ceramics techniques to design, make and appraise a mask that represents a part of themselves.

Keywords

Arts, Technology, 3D Art, Ceramics, Studies of Asia, Elements of Design, Mask, Identity, Research.

Knowledge Objectives

This learning module is based on the ACT Curriculum Framework: Every Chance to Learn.

As a result of completing this learning module, students will be able to:

EXPERIENTIAL OBJECTIVES

ELA 7: The student creates, presents and appreciates artistic works

7.EA.10 Reflect critically on the artistic works of others, including their peers, using specific criteria and the language of the art form.

CONCEPTUAL OBJECTIVES

ELA 7: The student creates, presents and appreciates artistic works

7.EA.2 Students will learn about the technical terms and structural principles appropriate to the art form.

7.EA.3 Students will learn and understand techniques for safe practice appropriate to the art form.

ELA 15: The student communicates with intercultural understanding.

15.EA.3 Displays empathy as a way of gaining insights into other cultures.

ANALYTICAL OBJECTIVES

ELA 15: The student communicates with intercultural understanding

15.EA.10 Identifies commonalities with their own cultural frame.

APPLIED OBJECTIVES

ELA 7: The student creates, presents and appreciates artistic works.

7.EA.7 Creates artistic works designed to elicit a response from and audience through exploration of subject matter of personal and social interest.

7.EA.8 Discusses the different ways artistic elements and concepts are used to convey meaning.

7.EA.9 Plans and prepares artistic works.

1. What is 3D Art?

For the Student

Think about what 3-D art is.

Brainstorm a list of words that can be related to 3D art.

List the 2D shapes that you already know. What are the names of these shapes when they are in their 3D form?

Fig. 1: A 2D animated character from a computer game composited with 3D backgrounds using layers.

For the Teacher

What is 3-D Art?

Students write out a list of 2D shapes that they know. Students then rename the shapes as they are known in their 3D form. ie square = Cube and so on.

Students brainstorm what they know about 3D Art.

Some prompting questions might be:

  • What is 3D art?
  • Where do you see 3-D art?

3D Art is something that you can walk around. It can be viewed from different angles and you can walk around it. 3D Art takes up space.

2. What is 3D Art?

For the Student

Students view and record notes on What 3D Art is.

3 Dimensional shapes are called forms. This means that they take up space. They have length, width and height - sometimes width and height can be called depth. Different objects have different forms. A pencil has a cylindrical from while a tennis ball has a spherical form.

A form can be seen from 3 sides, top, side and front view. Form is a very important part of our visual language. Other elements such as line, texture, colour, shape and pattern can also contribute to representing form. A 3D shape can be viewed from all directions (360 degrees).

Fig. 2: 3D Cube

For the Teacher

Students view and record information on 3D shapes and form. Students then experiment with changing a circle into a sphere.

In this activity students will change a circle into a sphere using line and shading. This activity is important because the students are beginning to manipulate line and shading to create a 3D effect on 2D.

Changing circles into spheres.

Students experiment with drawing 3 dimensional shapes by drawing still life pieces.

Students experiment with drawing 3 dimensional shapes by sketching 3D shapes provided.

3. Looking at 3D art

For the Student

Watch Powerpoint presentation.

Comment: Respond to the presentation. Think about what you liked and why? What did some of the images remind you of?

3D_Art.ppt
Fig. 3: The Thinker by Auguste Rodin

For the Teacher

Students view 'powerpoint presentation'.

Powerpoint presentation includes a variety of artists who use different media. This is shown to engage the students and give them some possible ideas.

4. Where and What is Form?

For the Student

Use the placemat to discuss and respond to the pinch pot creatures. Answer the following questions;

  • Observe each pinch pot creature from different angles. is it interesting from different view points. Identify why or why not.
  • What sort of shapes can you see?
  • Touch the pinch pot describe the texture.

Comment: Share your ideas with the group and then comment on one major point about the use of shape and texture.

placemat.gif
Fig. 4: Pinch Pot Creature

For the Teacher

Identifying form: Where/what is form?

In groups students look at examples of pinch pot creatures.

Students respond to the pinch pot creatures using a place mat strategy.

Scaffold with students how to use placemat strategy using the guiding questions.

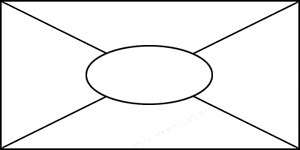
Write a response to the questions in their section of the placemat. Each group discusses their ideas and comes to an agreement to record one statement in the middle of their placemat that focusses on shape and texture.

PLACEMAT

This activity is designed to allow for each individual’s thinking, perspective and voice to be heard, recognised and explored.

  1. Form participants into groups of four.
  2. Allocate one piece of A3 or butcher’s paper to each group.
  3. Ask each group to draw the diagram on the paper.
  4. The outer spaces are for each participant to write their thoughts about the topic.
  5. Conduct a Round Robin so that each participant can share their views.
  6. The circle in the middle of the paper is to note down (by the nominated scribe) the common points made by each participant.
  7. Each group then reports the common points to the whole group.

A variation is to divide each section into three and include a PMI.

5. Identifying Form

For the Student

Shape and Texture are 2 of the elements of design.

Begin a glossary in your Visual Arts Diary – elements of design – SHAPE and TEXTURE.

Comment: Discuss Elements and how they are used in the pinch pot creatures.

For the Teacher

State the purpose of the elements of design.

Refer back to placemat pinch pot creature and describe the use of the element, SHAPE and TEXTURE to make glossary entries.

SHAPE - shape is any line that moves through space until it meets itself and forms an enclosure. Shapes come in different proportions and sizes, in 2 dimension and 3 dimension Everything is composed of one or more shapes.

TEXTURE - is the feel of a surface. It is also the illusion of an artworks surface quality, such as rough, smooth, shiny, dull.

Real Texture - is the actual texture of the object, how it feels - (tactile)

Implied Texture - 2 dimensional art is made to look like a certain texture but when touched there is no tactile sensation apart from the feeling of the media used.

In the Round - a 3 dimensional piece of sculpture that is viewable from all sides.

6. Looking at Sculptures

For the Student

What would a creature look like if it had no depth? Is it better or worse?

What would be one way to make sure that the sculpture that you create can be viewed by others in the round?

Remember to make sure that your sculpture is aesthetically pleasing from different angles.

Fig. 5: The Secret Bench of Knowledge - a Sculpture by Lea Vivot

For the Teacher

In the Round

Students begin to think about viewing scultpures from a multitude of angles. They examine how viewing in this way affects how they will form their sculpture.

This is taught because students tend to have a tendency to forget to consider all the different angles.

Generally students only consider the front and the back of their sculpture and not how it can be seen from above and from the sides.

7. Mystery Box Retrieval Chart

For the Student

Fill out the retrieval chart.

Mystery Box is a fun way to explore shape and texture. Close your eyes and draw what you feel. Items in the box are not revealed until everyone has had a chance to feel and draw their response.

'Retrieval Chart'

Retrieval_Chart.doc

For the Teacher

Students complete a Retrieval Chart for the elements of shape and texture as outlined below.

A range of items (contained in mystery boxes) that highlight different shapes or textures will be utilised.

Retrieval Chart Texture - Subjective Frame.

Mystery Box items

Some ways the students may feel - disgusted, excited, sick, creeped out, unsafe, sick, repulsed, weird.

8. Mystery Box Comparison

For the Student

Comment: Compare how the mystery box items made you feel with your shoulder buddy.

Talk about why your responses were different.

Maybe in your past you have felt something similar to the item and it reminded you of that time.

For the Teacher

Students compare their responses to the Mystery Box with partners initially. They look at how different people respond differently to different stimulus. Then they share their responses with the whole class through a comment.

9. What is a Pinch Pot?

For the Student

How do you think this would be made? As a group complete a brainstorm that lists the procedure.

After being shown how to make a double pinch pot, rewrite your procedure and compare and contrast with original ideas.

Add definitions to Glossary

Score

Scratch and Slip

Kiln

Glaze

For the Teacher

Show students a pinch pot.

Teacher demonstrates and explains how to make a pinch pot.

How to make a pinch pot egg

Divide piece of clay into 2 equal sizes. Roll into a smooth ball. Hold ball in non-dominant hand and with opposite thumb, press into the ball about 2/3 of the way through. Using thumb and forefinger gently pinch/press and pull in an upwards direction until the wall of the pot are approx 1cm thick. Repeat the process for the second pot.

If the clay is drying out or cracking, spray with vinegar/water mix (50:50). Allow to dry overnight in a sealed bag.

To put the pots together, score the lips of the pots and spray lightly with water/vinegar. Gently but firmly press together and twist so that they stick. Using the side of your thumb push the clay over the join. If needed use vinegar solution to repair crack or join.

If desired tap into shape with a tap stick.

Decorate with tools and glaze.

Put a hole in the bottom before firing to prevent the egg from exploding.

Fire in the kiln.

Score - to scratch or cut the surface of the clay in preparation for joining.

Kiln - An industrial furnace or oven specifically used for the firing of clay and other ceramic material.

Fire - the application of heat to harden clay r ceramic.

Glaze - A coating of colored, opaque, or transparent material applied to ceramics before firing.

Scratch and Slip technique - Score the lips of both pinch pots. Spray both edges lightly with vinegar solution. Gently but firmly, push and twist both pinch pots together. When pots have been joined using edge of thumb or tool ensuring join cannot be seen.

10. Safety with Clay

For the Student

Copy down notes regarding clay safety and usage.

Complete test.

Clay_Safety_Notes.doc
Clay_Test.doc
Sculpture_workshop_safety_test_2009.doc

For the Teacher

WRITE UP NOTES ON CLAY USAGE AND SAFETY

'Clay safety notes'

'Clay safety test'

'Sculpture test'

11. Sculpture by Feel

For the Student

Use your clay to shape 5 different shapes - with your eyes closed. No cheating, who is the winner on your table?

For the Teacher

Give students a piece of clay.

Ask them to split it into 5 equal pieces.

With their eyes closed students are to make 5 different geometric 3D shapes. They are to use their sense of touch.

Go from the easiest shape to the hardest shape. For example, sphere, cylinder, triangular pyramid, cube, rectangular pyramid, cone etc.

Have a table competition to see who has created the best shapes. Students are to decide the winner.

12. Create a Pinch Pots

For the Student

Produce a series of ideas for a pinch pot creature by completing 4-5 thumbnail sketches showing different viewpoints such as front, side and bird’s eye view. The sketches should show areas of applied texture (at least 2 different types of texture).

Create your pinch pot egg. Write up the procedure in your visual arts diary. Appraise your pinch pot creature design and final product.

Use What worked well (WWW)

and

Even better if... (EBI)

Make and join and the appendages. Write up the procedure in your visual arts diary.

Evaluate your pinch pot using the CQ Rubric.

clay_sculpture_cq.doc

For the Teacher

Creating Pinch Pots

Students plan their pinch pot design by completing a series of thumbnail sketches.

Students begin their pinch pot creature.

Model the techniques of forming and joining appendages to the class. Refer back to scratch and slip notes.

This activity can be modified to suit teacher needs, i.e. Faberge Eggs, pinch pot creates, pinch pot animals.

13. Masks in Our World

For the Student

Watch some Japanese Noh Theatre. Notice how the actor moves and how the actor makes the mask appear to change expression through the movement.

Look at the pictures of traditional Noh theatre masks, Jason, It and Lady Gaga.

Answer the questions

  1. How does this mask make you feel?
  2. What do you think these masks are used for?
  3. Do you know what cultures use masks like this?
  4. Do you think the masks are used to hide emotions or show it?
  5. How would it be different if the actor was not wearing a mask? How would the performance change?
  6. Do you know of any current day movies where masks are use?
  7. How does it make you feel? What makes it scary? (Think about the nothingness of the mask, could it be deliberately done using a blank mask for the viewer project their own fears onto the mask?)
masks.zip
Jasons_mask.jpg
it_stephen_king.jpg
lady_gaga.jpg
lady_gaga_red_costume.jpg

For the Teacher

Masks in Culture

SHOW THE TRADITIONAL NOH THEATRE CLIP FIRST THEN SHOW CONTEMPORARY IMAGES SO STUDENTS ARE ABLE TO LINK MASKS TO THEIR REAL WORLD.

Show students a brief clip of Japanese Noh Theatre Performance.

Show pictures of Jason and "It"

Resources

Japanese Noh Masks

Noh Theatre: Exploring a Japanese Art Form

Theatre Links: Noh Theatre

14. Who Uses Masks Today?

For the Student

Brainstorm and discuss why you think masks are used in culture?

Copy information from board.

Religious ceremonies - usually devoted to ancestors. Weddings, funerals, burials, coming of age.

Secret Societies Disguises, uniformity, identity,

Cultural beliefs - to protect the living from spirits, to ward off evil, to celebrate spirits and certain times of year ie Chinese New Year, Halloween

Enacting myths and stories - Japanese Noh masks

Fig. 7: Three images of the same Noh mask - note how tilting the mask changes the expression and emotion.

For the Teacher

Masks in Culture - where are they used?

Why are masks used in culture?

Discuss why some societies and religions use masks.

Use a mindmap tool such as Simple Minds or Poplet. Alternatively, do this on paper.

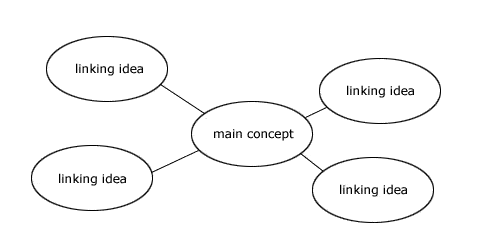
CONCEPT ORGANISER

Create a concept graphic organiser:

  • Name the concept, putting it in a circle at the middle of the page.
  • Connect it with Characteristics, in boxes linked to the concept with lines.
  • Provide Examples of each characteristic, in different-colored boxes linked to that characteristics.

15. Research Task

For the Student

Behind the Mask Research Assignment

Section 1: Asian Masks

Choose a culture or Asian country that uses masks. Explain when, why and how the masks are used

Provide an image of the mask, preferably colour. Critique and report how the features of the masks convey and emotion or convey a response.

Section 2: Analysing the Asian Mask

  • What is your response to the mask?
  • How has the use of line, colour and texture affected the meaning of the mask/
  • Would the feelings that the masks provokes change if the colours used were different?
  • What do you think the “story” behind the mask is?
  • What are some interesting facts about your mask? Think about uses, ceremonies, myths and legends that may be linked to your chosen mask.

Section 3: Masks in Australian Culture

Do masks play a role in Australian culture? How? Why do you think this is?

Include multimedia in your research project.

Fig 11: Noh Theatre Mask of an Old Man

For the Teacher

Students complete a research task to deepen their understanding of the use of masks in a variety of cultures.

Doing the project in Scholar will enable students to go through the writing process, drafting, giving and receiving feedback, and revising their work, before submitting for publication. The sections can be created using the Structure Tool in Creator in Scholar.

Project Rubric

16. Colour, Line, Shape and Emotion

For the Student

Brainstorm different emotions.

Pick at least 4 of the brainstormed emotions and think about a time when you felt this particular emotion.

What three colours would best describe that feeling?

What type of line would best describe that feeling?

What shape would best describe that feeling?

Create your own table that shows these things.

Colour__line__shape_diagram.doc
Fig. 13: Noh Mask Carving

 View Noh Mask Carving.

For the Teacher

Give students an A2 piece of paper and some chalk pastels.

Chalk pastels work well for this activity as they are a very expressive medium to work in and are easily blended.

Students blend, draw and experiment with colour, line and shape.

'Colour, line, shape example'

17. Elements of Design in Masks

For the Student

Look at the pictures and complete a placemat for each of the elements of design.

Think about, discuss and answer the following questions for each of the elements.

COLOUR

Why use these colours?

What effect does the choice of colour have on the meaning of the mask? (dark colour - what emotion?)

Do the colours help to enhance the expression on the mask?

LINE

Look at the masks. What effect does the use of line have on the mask?

Do the lines help to enhance the expression on the mask?(eg Swirly lines, happy, jagged lines angry, swirling lines calming like the ocean

SHAPE

Look at the masks. What effect does the use of shape have on the mask?

Do the shapes help to enhance the expression on the mask?

SYMMETRY

Look at the masks. What effect does the use of symmetry have on the mask?

Does symmetry help to enhance the expression on the mask?

What if the mask was not symmetrical?

Think about if you were trying to express split personalities. The masks may not be symmetrical.

masks.zip

For the Teacher

Colour, Line, Shape, Texture, Tone, Balance, Symmetry

Show clip of Masks from Noh Theatre.

Give students the laminated masks. A lot of the masks are the same mask but have been painted differently. Pose questions:

18. Effects on Audiences

For the Student

How do the masks help the actor change from one character to another? How is this evident apart from the physical use of the mask? (body movement)

How would it be different if the actor was not wearing a mask? How would the performance change?

Do you know of any current day movies where masks are use?

Would it be any different if Jason was not wearing the mask? or if the mask were non-threatening object like a cat? Compare to the It character and how "It" makes you feel.

How does Lady Gaga’s use of make-up affect her persona?

Fig. 9: Modern Masks

For the Teacher

Students revisit the Noh Theatre mask clip and look at picture of Jason, It and Lady Gaga.

Answer the questions using the Timed Pair Share strategy.

This is where students think about their response, record it in their visual arts diary and share with a partner in a certain amount of time. This is to ensure that time is used effectively.

This activity is for students to link the use of masks in traditional environments to the use of masks in their own real world.

This activity is also for them to consider what effect the masks have on the audience and the meanings that are conveyed through the masks.

19. Personality Traits

For the Student

Discuss with a group each others personality traits. Think about how you would describe the participants in your group to someone if you were asked to.

Keep these in your visual arts diary for later comparison.

For the Teacher

Students think about their own personality characteristics.

Using a Think-Write Round Robin, groups of friends (max of 4) write their name and a personality trait on a piece of paper and pass to the other students in their group. The next student records a personality trait that suits the person's name at the top of the sheet. This continues until there are at least 5 characteristics recorded on the sheet of paper for each student.

These are kept for later comparison.

To help students think about themselves in the third person, get to them to imagine they had to describe themself to someone who knows nothing about them.

Give some examples Cheerful, life of the party and so on. Use adjectives - descriptive words.

20. Starsigns

For the Student

What does your star sign say about you?

Look at the website provided and find your star sign.

What is your star sign? Find out a little about the characteristics of your sign.

Reflect: Do the characteristics listed match your own personality traits? How?

Record the personality traits in your visual arts diary against the traits that you have previously listed.

Find out your Chinese Star sign using the website provided. Find out  about the personality traits of your Chinese zodiac.

Comment: Do the characteristics listed match your own personality traits? How?

Examine how they compare.

Are there similarities?

Does your personality match the personality description of your star sign?

For the Teacher

In a lab students go to the web page about horoscopes and look at the characteristics of their Star sign.

Students record characteristics in their retrieval chart and compare them against the personality characteristics they had previously recorded.

21. Hide behind the Mask

For the Student

DMA a mask that represents you.

Choose a side or part of your personality that you would like to develop on a mask. Use the information gathered about Astrology, emotive colour, line, symmetry and why cultures to help you decide.

Design and sketch 3 different ideas.

Develop one of the ideas and continue to refine it and then make it.

For the Teacher

Design your mask

Students are to design 3 ideas to develop and experiment with.

Their mask must somehow represent them in some form. This could be personality traits, colour that they identify with, line types that they identify with and so on.

22. Acknowledgements

The original version of this learning module was written by Joanne Robinson and Kelly-Anne Guy.

Title: (Source); Fig.1: "BabyAnimation" by Connor McKee - Own work. Licensed under CC BY-SA 3.0 via Wikimedia Commons (Source); Fig.2: (Source); Fig.3: (Source); Fig.4: (Source); Fig.5: (Source); Fig.6: (Source); Fig.7: (Source); Fig.8: (Source); Fig.9: (Source).